|
|
Post by John Kanters on Jan 18, 2012 21:36:57 GMT -8
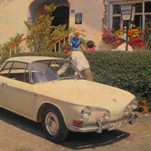
My T34 interest started some 15 odd years ago when a couple of friends and I visited the US and met up with Lee and while we were there, we went to visit one of Lee's friends so I was offered to drive Lee's Ghia while he took his double cab bus. At the time I thought.....but you don't know me from a bar of soap, are you serious? Well, no need to ask twice so off we went. I'd never driven a Type 3 before and being used to cramped Beetles I was impressed with its interior room and the way it drove but what really took me was the lines of the body and the thin pillars which makes the vast expanse of glass look even better. But sadly that's as close as I got to owning one till a few years ago when I suddenly felt the need to own a T34 after restoring / building quite a few cars bot water and air cooled. Started looking on the Samba and found a 69 automatic which seemed ok for the money and after a few phone calls the deal was made, the next day I went to make a deposit as agreed and checked my email for the sellers contact details and he'd actually emailed me to say he'd already taken a deposit............even though we'd already made a deal!  Not terribly impressed with his lack of ethics but obviously nothing I could do so I went looking again finding this 63 a few weeks later. The seller didn't have much info on the car other than that he'd known about it sitting in a garage and kept in touch with the owner so when it was time to sell he grabbed it cleaned it up and put it up for sale. Bit of a shaky beginning to our deal but the seller turned out to be a top guy, sent detailed pictures of area's I'd asked about and kept his word so a purchase was made. I had the car transported from northern San Francisco to LA to be shipped to NZ by a company I'd used before. Couple of months later she arrived on our shores only to sit out on the wharf in torrential rain for over a week  Just as well there were big rust holes in the floor for the water to drain out of! First impressions were pretty good, looks like its only had one blow over in its life, car is 98% complete and still a driver. Sure there's all the rust issues that they all suffer from but no nose damage and a pretty straight body so I was happy! Since I was busy with another project I put the Ghia in storage till I was ready to begin. Over those 2 years I collected some parts like a set of Gerson's floors, all the seals that Simon makes and a bunch of other parts I got on a trip to the US last year. With the completion of the other project, 2012 was to be the Ghia's year so yesterday we got her out of her corner where she sat waiting and rolled into the workshop. Going to begin work on it this Saturday but in the meantime here's a couple of pictures of where she lived up to yesterday.   |
|
|
|
Post by Carsten Klein on Jan 19, 2012 1:03:04 GMT -8
hi John!
cool story ! keep us updated !!!!
carsten
|
|
|
|
Post by John Kanters on Jan 20, 2012 20:16:56 GMT -8
Well today was interesting, never taken apart a T34 before. Had to do things a bit different to what I normally do, I'm used to just tearing apart a Bug convertible and throwing most of the parts in the trash as they'll all be replaced with new anyway but in this case I know a lot of this stuff is not available so I really took my time taking it apart and saving everything no matter how worn out it is. Few frozen bolts on the doors but the oxy acetylene sorted those out and one wouldn't budge so I just drilled the head off. Plenty of rust in the C pillars..............as well as in other places but hey the car is 50 years old now and not exactly known for being rust free! Repairing the rust will be the biggest part of this project and I'm sure I'll need to re make a lot of panels to get her in shape again. Took off all the side glass and trim first being carefull not to wreck anything followed by cutting the screens out, was surprised to find the front screen laminated.........thought for some reason it would have been toughened. All that aluminum trim is soo delicate, must put that in a safe place.  Stripped the dash, front of the car and also all the lights out. Car has only had one paint job in its life so that's pretty good and the wiring is also in good shape with no one really butchering it over the years. The nose on this car is in great shape, never hit and only minor rust around the wheel tray so I'm stoked with that. By the way Lee, the stamped number under the ID tag is 1404 on this car. Will work on getting the body unbolted next, I'm undecided what I'll start repairing first, body or pan.................hmmm both need an awfull lot of work!    |
|
|
|
Post by Rick Hasse on Jan 23, 2012 13:10:45 GMT -8
Hi John. Great project and happy to see you are keeping it alive.
Good Luck!!
Rick
|
|
|
|
Post by Tobias Ebner on Jan 26, 2012 8:52:02 GMT -8
Hello John,
good luck for this project!
Please show us many pictures...
Tobias
1963 T34
|
|
|
|
Post by John Kanters on Jan 27, 2012 23:51:58 GMT -8
This morning was time to brace the body before separating it from the chassis, I made some plates that bolt to the door pillars and striker plate areas and then welded in bracing which I cut from scrap tubing we had lying around the shop. The bracing is more of a precaution as I'll be putting it in a rotisserie for all the rust repairs so I don't want anything weird to happen to the door gaps when big sections of the sills and pillars are cut away. With the body hanging in a rotisserie from its bumper mounts all the stress would go into the roof and pillars, seeing as the rear pillars are pretty shot the bracing will stop any movement there. Anyway rather than groveling on the ground I just lifted the front in the air to be able to work underneath unbolting the body from the floor, quite handy that overhead crane! That, combined with a rattle gun to get all the rusted bolts out made short work of it, no broken bolts but lots of rust........   Body unbolted and all other stuff disconnected it still wouldn't budge so had another good look and found 4 remaining bolts still attached With those out it was a simple case of up up and away! Sweeeet!   Haha I always joke with people how easy it is to pull cars apart........ With the chassis rolled out from underneath I could start pulling that apart, pretty much removed everything off the chassis and pulled the motor out and front end off also. Its nearly at its bare bones with only the rear subframe and gearbox left to come out after which I'll store everything away and start constructing a rotisserie out of a couple of engine stands.  |
|
|
|
Post by John Kanters on Feb 3, 2012 21:27:24 GMT -8
Thought I'd better start on making that rotisserie today as the body of the car has been in the way most of the week so I haven't been able to get any cars in or out of the shop. Felt that the best and quickest way would be to use a couple of engine stands and seeing as I already had one I just bought a 2nd used one locally. Started out making the mounts that bolt on the bumper mounts in the body, mainly tried to use scrap steel that we already had at work so it was a case of whatever works. Figuring out where the center of gravity was on the body became a bit of a guessing game so after deciding how high to make the stands I cut up one of the engine stands and lengthened it by about 200mm and also widened it between the wheels to make it more stable. That worked out pretty well and with the body hanging level in the gantry crane I could then measure up the back of the car and make the stand for that end. With the 2nd stand done I dropped it down on the ground but it became evident pretty quickly I'd need to tie the stands together to stop them splaying out. Some simple furniture tube bolted between the stands sorted that problem out pretty quick. The great thing is that when this is done I can then use this stand for the Convertible and all I need to change is where it bolts to the body Its certainly not going to win any awards but I didn't feel like spending all day making this thing so rough and ready it is!! Balance is perfect, spins over very nice and at no time does it want to suddenly drop away from you so that's pretty cool. Will be miles easier to work on the lower half of the body this way.    Pulled out the remainder of parts from under the dash, front hinges and wire harness front and back. What is the best way to remove the rear deck springs? seem like pretty strong suckers that could inflict some pain Also want to pull out the wire harness running through the rocker..........but that seems like a nightmare........any tips there? |
|
|
|
Post by Franck Boutier on Feb 4, 2012 6:56:15 GMT -8
Hello John , I think that the removing of the rear deck springs isn't an easy task. Here's what you can find in the VW factory book about it . Some pieces of steel need to be handmade and inserted in the springs. Concerning the wiring harness , if this one is in a good state, the best way is certainly to give it a good protection and keep it in place. Attachments:
|
|
|
|
Post by bobnotch on Feb 4, 2012 12:24:39 GMT -8
I bought a box of 100 1/4 inch flat fender washers, and inserted them as best as I could (some spots were doubled and or tripled) to take up the gaps between the coils (like the factory shows). It wasn't pretty, but it did work.  Getting the springs back in place was another story.  |
|
|
|
Post by Greg Skinner on Feb 4, 2012 15:40:49 GMT -8
If you end up needing one, I have a reproduction left hand drive Type 34 wiring harness available for $420.00 USD, plus shipping.
|
|
|
|
Post by John Kanters on Feb 4, 2012 18:15:33 GMT -8
Thanks for the tips guys, I did figure on slipping something between the springs to get them out but thought I'd ask first.
I have some 5mm thick plate steel at work so that will probably work, will give it a shot anyway.
The wire harness seems ok but just wanted it out for rust repairs and paint etc.
I plan on cleaning the rest of it and repairing whatever needs repairs but that section running to the back may just have to stay there.
Pretty awkward the way its been put in there.....
|
|
|
|
Post by bobnotch on Feb 6, 2012 9:52:05 GMT -8
Yeah, I left the 1 in my 64 T-34 right where it was. It looked like way too much work to try and get out, let alone trying to get a new one back in. I ended ohm metering all the wires, and only found 2 that were broke (eaten thru) out of all of them. At least they were broke right above the left rear tire well where I had easy access to fix them.  Not too bad considering that the car was parked for over 25 years, and was home to several species of animals. Your 63 looks like it had the same issues as my 64, rust underneath from sitting. |
|
|
|
Post by John Kanters on Feb 7, 2012 1:12:31 GMT -8
Yeah the package tray is pretty manky and thin in places, will be interesting making a new one.
I'll remove the parcell shelf first to get at it better, strange how its really good in places and yet so rotten in others.......but then again she's 50 now.
|
|
|
|
Post by John Kanters on Feb 10, 2012 20:50:44 GMT -8
Been thinking all week where to start.................I guess it was a little overwhelming looking at the scale of repairs to be done! In any case I thought replacing the panel above the transmission would be a decent place to start so in order to get at it properly the parcel shelf needed to come out so I got to work drilling spot welds out. Bob, Used your washer trick on the rear lid springs that worked easy as. Putting them back in is easy too, hook the spring in at the bottom, then hook on the hinge, slide hinge into place and put the hinge pin through, remove washers........job done. Ended up having to drill through all 3 skins to be able to release the parcel tray but after a few hours work it came away relatively cleanly. That panel is in decent shape, just have to make a new box section that runs along the front of it as the ends have rusted off. The little shelf below that was also heavily rusted so I took that out as well and will have to make a new one of those. With both trays out of the way its easy enough to get at the main panel above the transmission so that will have to come out next, chipped off all the old sealer so I can find all the spotwelds. Before that panel comes out I'll first get to work making a new panel, pretty much will have to be made in 2 pieces at least but I'll be able to join them somewhere. Side panels also need quite a few repairs but these are also easy to get at now with the parcel tray out of the way. Tell you what I'm super happy I made that rotisserie as its made life a whole lot easier!    |
|
Deleted
Deleted Member
Posts: 0
|
Post by Deleted on Feb 11, 2012 22:01:29 GMT -8
Looking real good John.... Awesome progress is such a short period.... Wonder what it'll be like living with a lhd car?.... You'll be needing a rhd door mirror and quarter light for sure!
|
|


 Just as well there were big rust holes in the floor for the water to drain out of!


 Getting the springs back in place was another story.
 Not too bad considering that the car was parked for over 25 years, and was home to several species of animals.